Introduction to Azure Information Protection Scanner
Azure Information Protection Scanner is a tool designed to discover, classify, and protect sensitive information across your organization’s IT environment, including on-premises and cloud repositories. It helps enforce data protection policies, ensures compliance with regulatory standards, and enhances overall data security within Azure and hybrid environments.
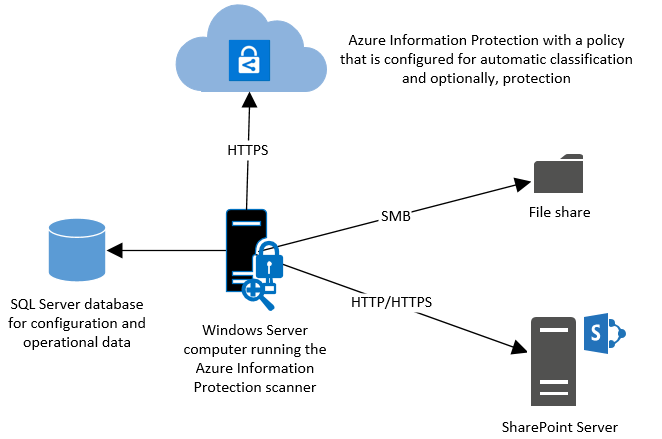
Part 1: Azure Information Protection Scanner Overview

Figure 1 – AIP Overview
1.1 Key Features
1.1.1 Data Discovery and Classification
Automatically scans data repositories to identify sensitive information.
Classifies data based on predefined or custom labels to apply appropriate protection
policies.
1.1.2 Policy Enforcement
Applies encryption, access controls, and rights management based on data classification and policy rules.
Integrates with Azure Rights Management (Azure RMS) for consistent protection across
platforms.
1.1.3 Compliance Monitoring
Generates audit logs and reports for regulatory compliance assessments.
Part 2: Configuration Steps for Azure Information
Protection Scanner
2.1 Prerequisites
Before you start, verify that your system complies with the required prerequisites.
Use the following steps to configure and install the scanner:
- Configure the scanner settings.
- Install the scanner.
- Get a Microsoft Entra token for the scanner.
- Configure the scanner to apply classification and protection.
Next, perform the following configuration procedures as needed for your system.
2.1.1 Azure Subscription
Ensure you have an active Azure subscription with appropriate permissions to deploy and configure Azure services.
2.1.2 Installation Package
Download the Azure Information Protection Scanner installation package from the Azure portal or Microsoft Download Center on the link. https://www.microsoft.com/enus/download/details.aspx?id=53018

Figure 2 – Download scanner package
2.2 Deployment and Configuration
2.2.1 Installation
Run the installer and follow the on-screen instructions to install the Azure Information
Protection Scanner on designated servers.
2.2.2 Configure the scanner settings
• Create a scanner cluster.
• Create a content scan job.
• Run the Install-AIPScanner cmdlet, specifying your SQL Server instance on which to create a database for the information protection scanner, and the scanner cluster name that you specified in the preceding section:
❖ PowerShell: Install-AIPScanner -SqlServerInstance -Cluster
2.2.3 Data Source Configuration
Specify the data repositories (file shares, SharePoint sites, Exchange servers) to be
scanned by the Azure Information Protection Scanner.

Figure 3 – Create scan job

Figure 4 – Create the repository in our case folder contains files

Figure 5 – repository created
2.2.4 Scanner Settings
Configure scanning schedules, scan depth, and scanning criteria (e.g., file types, sensitivity labels) according to organizational policies.

Figure 6 – Scanner configuration

Figure 7 – Scanner configuration
• Get a Microsoft Entra token for the scanner:
A Microsoft Entra token allows the scanner to authenticate to the Azure Information Protection service, enabling the scanner to run non-interactively.
To get a Microsoft Entra token:
1. Open the Azure portal to create a Microsoft Entra application to specify an access token for authentication.
2. From the Windows Server computer, if your scanner service account has been granted the Log on locally right for the installation, sign in with this account and start a PowerShell session.
Run Set-AIPAuthentication, specifying the values that you copied from the previous step:
PowerShell: Set-AIPAuthentication -AppId -AppSecret -TenantId -DelegatedUser

2.3 Integration with Azure Services
2.3.1 Azure Information Protection (AIP)
Integrate the scanner with Azure Information Protection to leverage classification and
protection policies defined in AIP.
2.3.2 Azure Rights Management (Azure RMS)
Enable integration with Azure RMS to apply rights management protections to sensitive
documents identified by the scanner.

Figure 8 – Request RMS permission

Figure 9 – Select read/write content delegated
2.4 Policy and Label Configuration
2.4.1 Define Sensitivity Labels
Define sensitivity labels in Azure Information Protection portal based on data classification requirements (e.g., Confidential, Internal, Public).
Figure 9 – Select read/write content delegated
2.4 Policy and Label Configuration
2.4.1 Define Sensitivity Labels
Define sensitivity labels in Azure Information Protection portal based on data classification requirements (e.g., Confidential, Internal, Public).

Figure 10 – define the sensitivity label
2.4.2 Policy Enforcement
Configure Azure Information Protection policies to automatically apply protection actions (e.g., encryption, access controls) based on sensitivity labels.

Figure 11 – Enable DLP rules
2.5 Testing and Validation
2.5.1 Test Scans
Perform test scans on sample data repositories to validate scanning accuracy and policy
enforcement.

Figure 12 – Scanning process

Figure 13 -Scan job status
2.5.2 Policy Simulation
Simulate policy violations and monitor scanner-generated alerts to ensure proper policy
enforcement and incident response capabilities.

Figure 14 – Scanner report

Figure 15 – Detailed report about specific scanned file
Conclusion
Azure Information Protection Scanner offers robust capabilities for data discovery,
classification, and protection within Azure and hybrid environments. By following the
outlined configuration steps and best practices, organizations can strengthen their data
security posture, ensure regulatory compliance, and protect sensitive information
effectively.
Mostafa Ashraf
System Engineer