Azure Application Gateway, Load Balancer, and Front Door are all services offered by Microsoft Azure that provide traffic management and load balancing capabilities, but each serves a slightly different purpose and offers distinct features. Here’s a comparison of the three:
Azure Application Gateway:
- Layer: Application Gateway operates at Layer 7 (Application layer) of the OSI model.
- Functionality: It is primarily used for HTTP/HTTPS traffic and provides advanced traffic management features such as URL-based routing, SSL termination, Web Application Firewall (WAF), session affinity, and HTTP header modification.
- Use Cases: Ideal for managing and securing web traffic to your web applications, especially when you need features like URL routing, SSL termination, or WAF.
Azure Load Balancer:
- Layer: Azure Load Balancer operates at Layer 4 (Transport layer) of the OSI model.
- Functionality: It provides basic load-balancing capabilities by distributing incoming network traffic (TCP and UDP) across multiple virtual machines (VMs) or instances within a virtual network.
- Use Cases: Suitable for balancing traffic for any TCP or UDP-based service, such as HTTP, HTTPS, TCP, UDP, and other protocols. It’s commonly used for load-balancing traffic to backend VMs or services within a virtual network.
Azure Front Door:
- Layer: Front Door operates at Layer 7 (Application layer) of the OSI model.
- Functionality: It is a global, scalable entry point for web applications, providing advanced traffic management features like global load balancing, SSL offload, WAF, URL routing, and session affinity.
- Use Cases: Designed for optimizing the delivery of web applications by providing low-latency, high-availability access to users from anywhere in the world. It’s ideal for applications that require global scale, high performance, and advanced traffic management capabilities.
Notes:
- Azure Front Door provides global load balancing, SSL offloading, and DDoS protection.
- Azure Application Gateway provides advanced routing features like URL-based routing and cookie affinity.
- Azure Load Balancer is used at the transport layer for basic load balancing of network traffic.
- Scenario:
Let’s say you have a simple web application deployed on multiple virtual machines (VMs) in Azure. You want to ensure high availability, scalability, and efficient traffic routing to these VMs. For this purpose, you can use Azure Application Gateway, Load Balancer, and Front Door.Top of Form
- Demo Steps:
- Create Virtual Machines:
- Deploy two virtual machines in Azure with your web application installed.
Configure Web Apps in the Azure Portal by adding it from creating a resource, and choosing web APP.

- Create Azure Application Gateway:
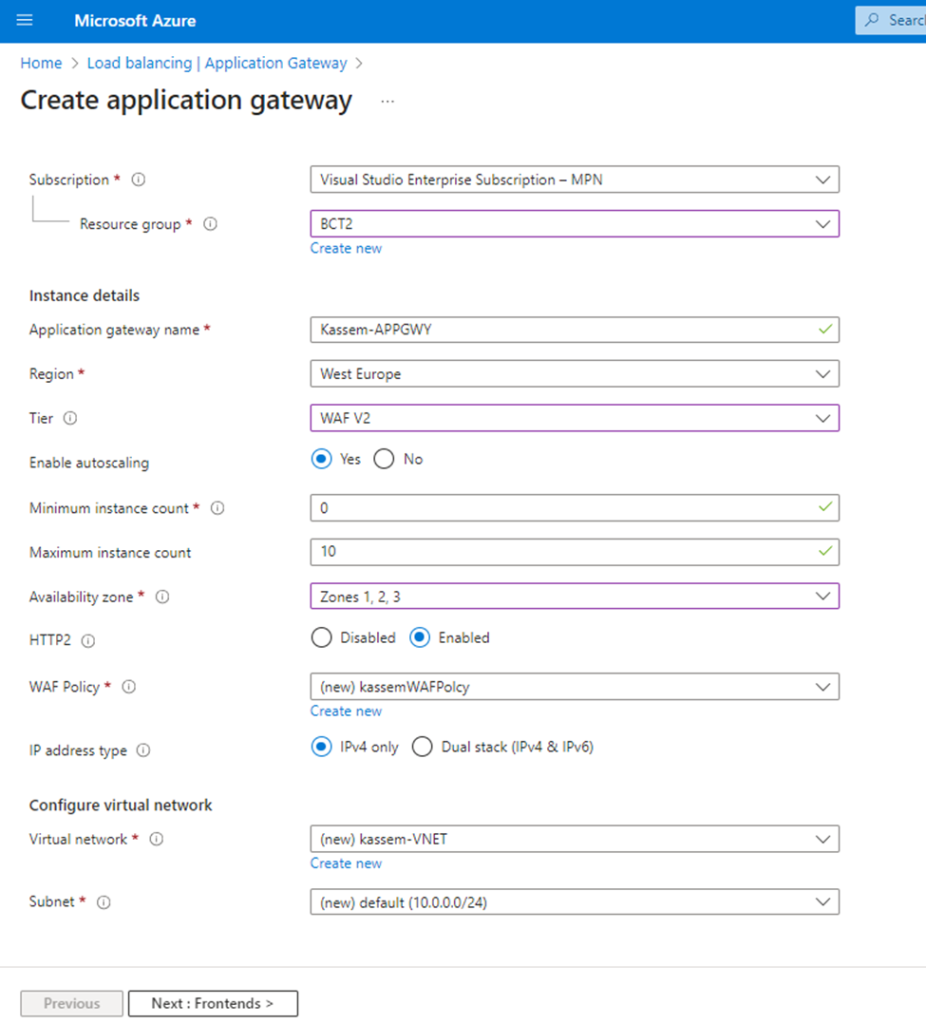
- Create an Azure Application Gateway.
To create ALP go to the Azure portal and create a new Azure Load Balancer, in this case, I use WAF Tair and you can consider the deployment in different availability zones.

- Define routing rules to route traffic to the backend pool of your Load Balancer.

- Configure listeners for HTTPS (SSL termination) and HTTP.

- Create Azure Load Balancer:
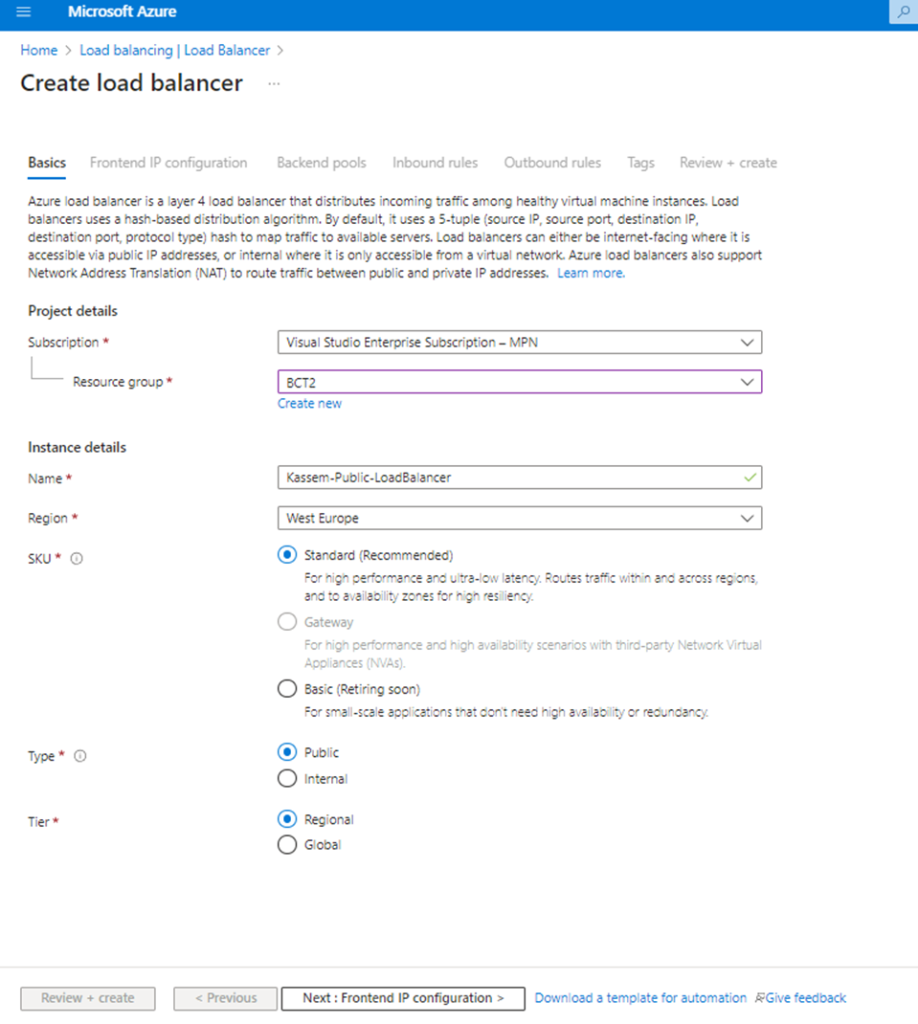
- Create a new Azure Load Balancer.
In the Azure portal, click on the “Create a resource” button Then, search for “Load Balancer” in the search bar, select “Load Balancer” from the search results, and click on the “Create” button to start creating a new load balancer.

- frontend IP
Configure the frontend IP address and ports for your load balancer.

- Configure backend pool to include all your VM instances.

- Configure health probes to monitor the health of your VM instances.

- configure inbound rules

- Set Up Azure Front Door:
- Create a new Azure Front Door instance.
You’ll need to provide some basic information such as the subscription, resource group, and Front Door name. Choose the subscription and resource group you want to use or create new ones. Then, specify a name for your Front Door.Click on “Create a resource” in the upper left corner of the Azure portal. In the search bar, type “Front Door” and select it from the results. Click on “Create” to start the creation process.

- Define frontend hosts (your custom domain).
This is the domain or subdomain that your users will use to access your application. Click on “Add a frontend host” and enter the hostname
- Configure routing rules to direct traffic to your Application Gateway.
Routing rules determine how incoming requests are routed to backend pools. Click on “Add a routing rule” and configure the rule by specifying a name, frontend hosts, backend pool, and other conditions.
Abdelrahman Kassem
System Engineer

